Understanding the Editing UI
Understanding the Editing UI
Once your file is transcribed, you'll see Narralyn's editing interface. It's designed to feel like editing text in a notebook, but every word is linked to the audio.
The Three Main Panels
Narralyn's interface has three main sections:
1. Audio Timeline (Top)
A visual waveform of your entire audio file.
What You See:
- Waveform bars = Audio volume (taller = louder)
- Colored sections = Audio that will be kept, where each color corresponds to the marked words in the same color, on the Word Editor
- Red playhead = Current playback position
- Button Panel = Buttons to play, zoom, cut, edit and delete cuts
What You Can Do:
- Click anywhere to jump to that time
- Zoom in/out for precision editing
- See the overall structure of your audio
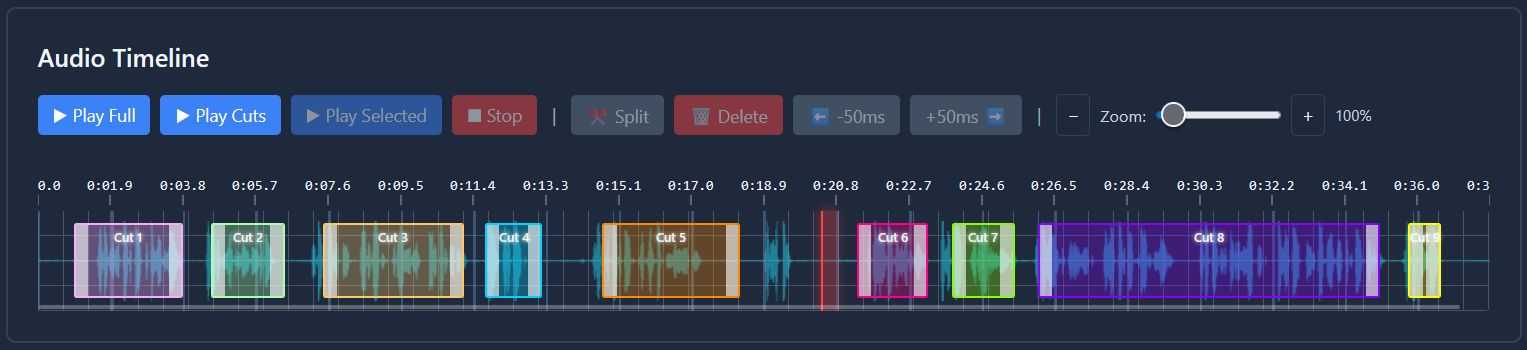
What Each Button Does:
- Select All Words - Select all words into a single cut
- Select All & Filter - Select all words and filter the silences (creates multiple cuts)
- Filter Silence - Filter the silences from the current cuts (adds more cuts)
- Undo - Revert timeline to previous state
- Redo - Restore timeline from previous state
- Play Full - Play the entire audio file
- Play Cuts - Play each of the cuts in order. Resembles how the exported file will look like
- Play Selected - Plays a selected cut
- Stop - Stop the playback
- Split - Split a cut in the play head position
- Delete - Delete the selected cut
- -50ms - Expand the selected cut 50 ms away from its start time
- +50ms - Expand the selected cut 50 ms away from its end time
- Zoom bar - Expand or retract the timeline
1. Word Editor (Middle)
The heart of Narralyn - your transcript displayed as editable text.
Key Features:
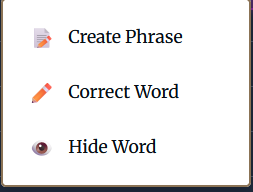
- Click any word to create a cut from a word
- Click and drag multiple words to create a cut from multiple words
- Hide words to hide them from the transcript
- Edit text to change a word (doesn't affect audio)
- Create Phrase to change multiple words at once (doesn't affect audio)

Visual Indicators:
- Colored Words = Words that are part of each cut
- Gray strikethrough = Hidden words
Pro-tip: Right click on a word to access word-specific actions
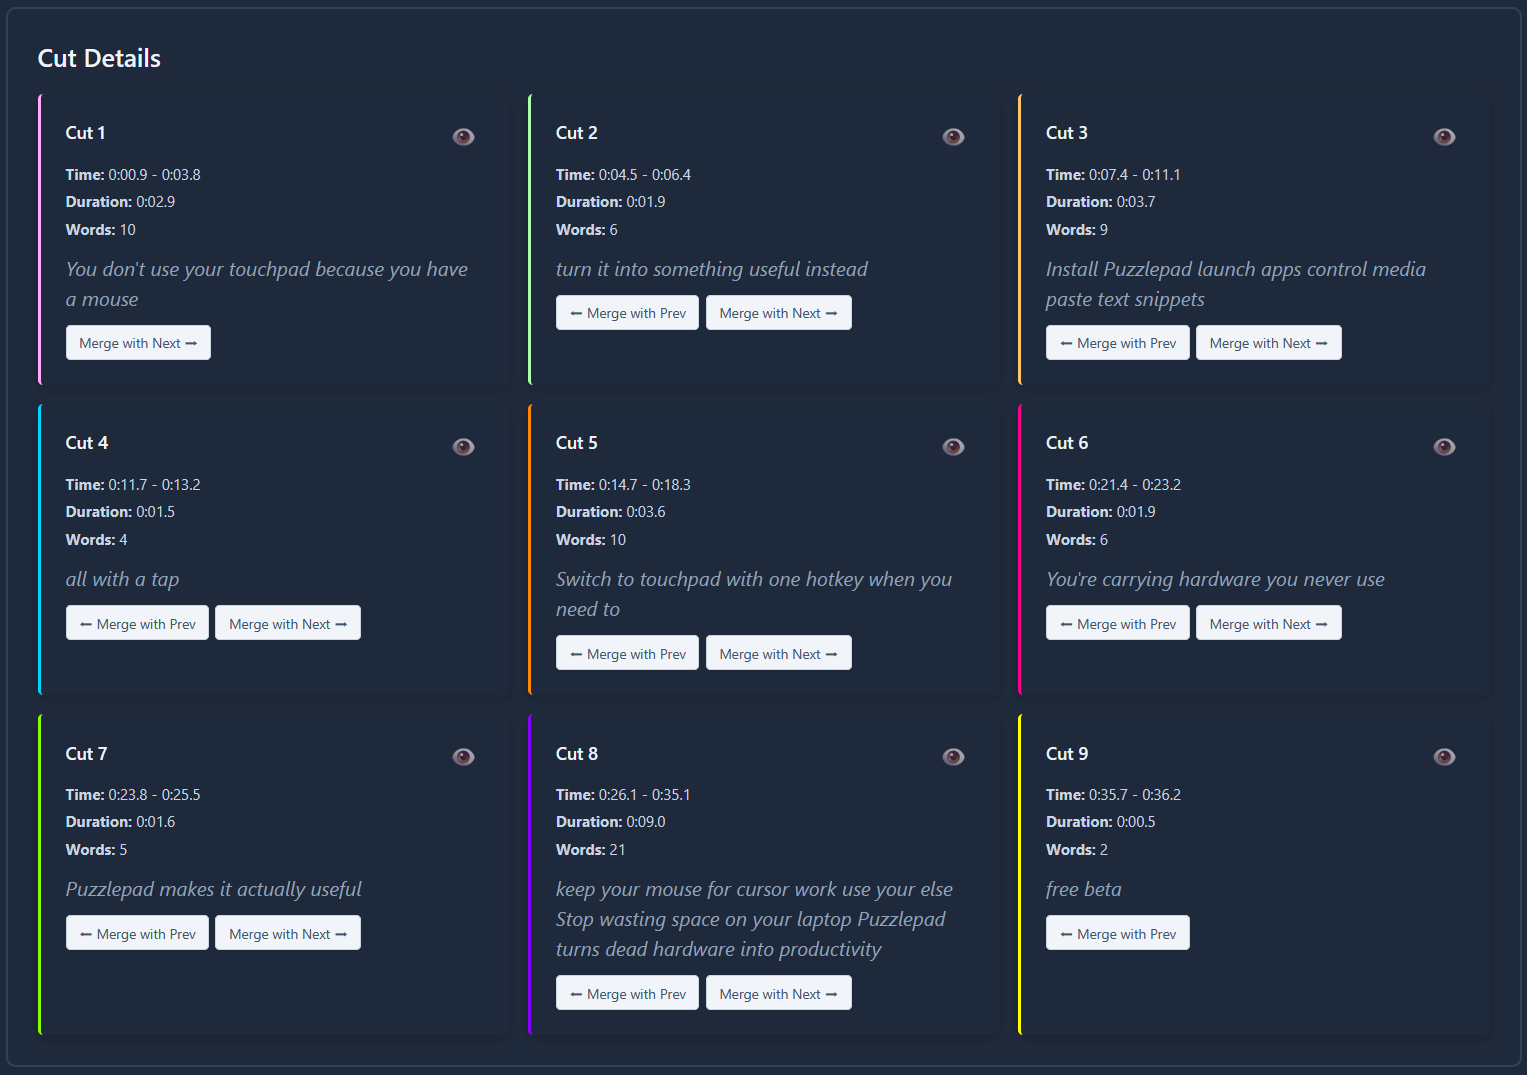
3. Cut Details Panel (Bottom)
Detailed information about the currently selected cut.
Displays:
- Cut number (e.g., "Cut 3 of 24") and color (according to Audio and Word Timelines)
- Start and end timestamps
- Duration of the cut
- Number of words in the cut
- Transcript text for this cut
- Actions: Hide (top right eye button on each cut), merge with previous, merge with next
Top Menu Bar
Always visible at the top:
Left Side:
- Narralyn logo → Return to homepage
- Credits balance → Current credits remaining
- Save / Load → Offline save and load
- Project name → Shows current file name
- Dropdown Button → Project selector - allows to select another project
Right Side:
- Settings → Preferences (delete account, auto-save, etc.)
- Logout → Logout of Narralyn
- Export Cuts → Download your edited audio, multiple options available
- Delete Project → Clean up your project list by deleting the currently selected project

Keyboard Shortcuts
- Space = Play/pause
- S = Split at playhead
- ←/→ = Move playhead
- PgUp/PgDn = Change page
- Delete = Delete cut
- Ctrl+Z = Undo
- Ctrl+Y = Redo
- Ctrl+N = New project
Common Questions
Q: How do I save my work? A: Cloud Auto-save / sync is enabled by default. Your work is saved every 30 seconds automatically. Additionally, you can work offline from the moment your transcript has been created.
Q: Can I work on multiple files at once? A: No, Narralyn works currently one file at a time. Use the dropdown list to the right of your project name to load a different file.
Next Steps
👉 Word Editor Basics - Learn advanced word selection, deletion, and editing techniques
👉 Using the Audio Timeline - Master timeline navigation, zooming, and precision editing